🔬 DIY Midsole Compression Test With Household Tools
Want to know exactly when your trail running shoes have lost their magic bounce? With just a ruler, some weights, and a little patience, you can quantitatively track your shoe’s midsole compression at home—no fancy lab gear required. This guide delivers step-by-step testing methods, real-world case studies, data-logging tips, and advanced troubleshooting so you’ll never wonder “is my shoe dead?” again.
1️⃣ Why Test Trail Shoe Foam at Home?
Midsole foam—whether EVA, PEBA, TPU or PU—is the heart of your trail shoe’s cushioning and rebound. But unlike visible outsole wear or torn uppers, foam breakdown is often invisible. Over time, repeated impacts cause the midsole to compress and lose energy return, making each stride less efficient and raising your injury risk. Knowing exactly when your shoe’s cushioning drops below safe thresholds is key for both performance and injury prevention—especially for ultrarunners who push gear to its limits.
- Subjective “feel” is unreliable—most runners underestimate foam fatigue by 100–200 km.
- Some superfoams (e.g. PEBA, PEBAX) show little visible change before sudden collapse.
- Many brands offer only vague lifespan ranges (e.g. “300–800 km”), not actionable metrics.
- Advanced runners and shoe testers now use home-based protocols for quantitative tracking.
In this guide, you’ll learn practical DIY methods to measure, log, and interpret midsole compression—so you know exactly when to retire or rotate your trail shoes.
2️⃣ The Science of Foam Compression: How Shoes Wear Out
Every step you take during a run compresses the midsole foam, converting kinetic energy into shock absorption. Over hundreds of thousands of steps, the foam’s cellular structure starts to “creep”—gradually losing its ability to spring back. This permanent compression is called foam fatigue, and it’s the single best indicator of a shoe’s true lifespan.
- Elastic Compression: The foam rebounds fully after load (healthy shoe).
- Plastic Compression (Creep): Some thickness is lost permanently—classic “dead shoe” feel.
- Visible Sag or Wrinkles: Late-stage breakdown (but many shoes fail before this point).
- Effect on Biomechanics: Increased impact, reduced propulsion, higher injury risk, especially ITB and tibial stress syndromes.
3️⃣ What is a DIY Midsole Compression Test?
A DIY midsole compression test is a simple, repeatable way to measure how much cushioning your shoe has lost. By applying a known weight to your shoe and measuring midsole thickness before, during, and after loading, you can track permanent foam loss over time. This mimics professional lab protocols (which use expensive machines), but with home tools—rulers, books, water jugs, and calipers.
- Inputs: Trail shoe (remove insole), digital caliper (or precise ruler), household weights (books, water jugs), flat board.
- Outputs: Measurements of midsole height: initial, under load, and after recovery (permanent compression).
- What you learn: % of foam thickness lost; compare against new/old shoes and scientific “replacement” benchmarks.
This test is essential for ultrarunners, heavy runners, and anyone pushing shoes to the mileage limit.
4️⃣ What Tools Do You Need?
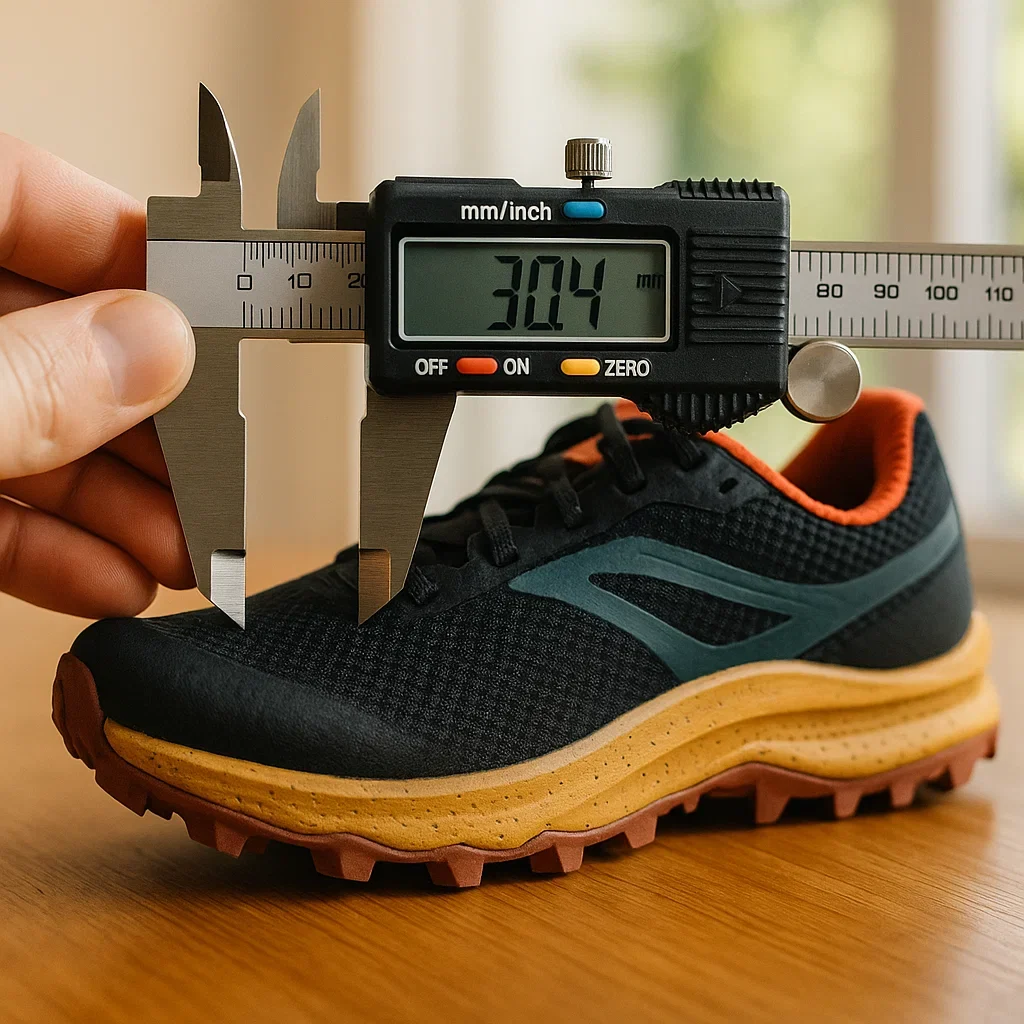
- Digital Caliper (recommended): For millimeter-accurate midsole height readings (cost: ~300₺-500₺). Analog caliper or high-quality ruler is OK for casual use.
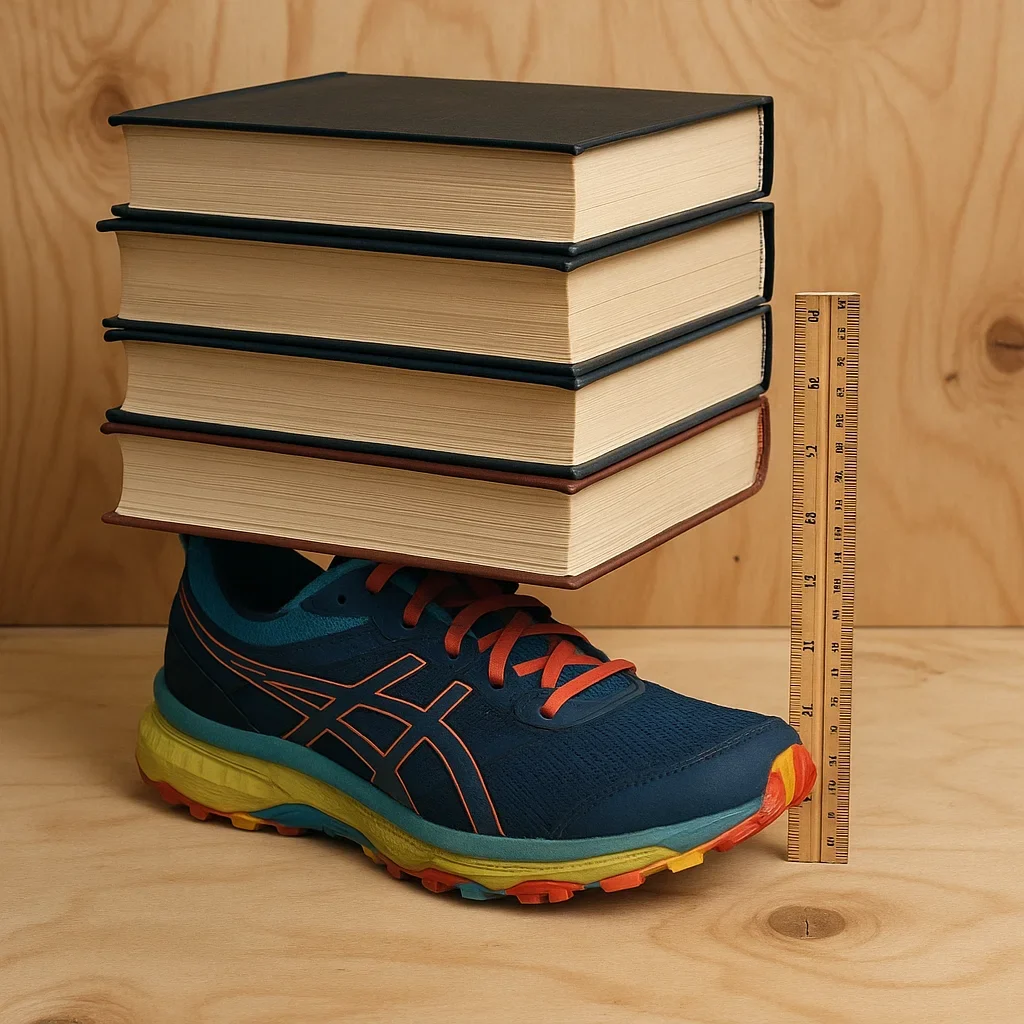
- Flat Board: A cutting board, sturdy book, or flat wooden plank to distribute weight evenly.
- Known Weights: Water jugs (5-10L), dumbbells, or any objects you can weigh precisely. Aim for 10–20 kg total load to simulate real footstrike forces.
- Scale: To verify the weight used (especially if using random objects or home gym weights).
- Notebook/Spreadsheet: Log each measurement by date, shoe, location (heel/forefoot), and number of cycles.
- Pen, Tape, Sticky Notes: For marking measurement points and ensuring consistency between tests.
Tip: If possible, test both a new (unused) and your used shoe for comparison.
5️⃣ Step-by-Step Protocol: Measuring Midsole Compression at Home
Here’s the most validated at-home test for trail shoe foam breakdown. Do this every 100–200 km or whenever you suspect the shoe feels “flat” or harsh:
- Prep the Shoe: Remove insole and sockliner. Place the shoe on a hard, level surface. Ensure it is dry and at room temperature. Mark your measurement points (center heel and forefoot) with pen or tape.
- Record Baseline Thickness: Use a digital caliper (or ruler) to measure midsole thickness at the heel and forefoot. Record values in millimeters. (Example: heel = 28.0 mm, forefoot = 19.5 mm)
- Set Up the Load: Place the flat board atop the shoe. Stack your pre-weighed objects (books, water jugs, dumbbells) on the board. Verify total weight with the scale. Standard home test: 10 kg (≈100N), but 15–20 kg gives clearer results.
- Apply Load: Let the weight rest on the shoe for exactly 5 minutes. (Some protocols use 1 minute; longer is more sensitive.) Ensure the weight sits evenly over the measurement points.
- Measure Under Load: While the weight is still on, measure the compressed height (board to floor) at the same heel and forefoot points. Record.
- Remove Load and Rest: Take off the weights/board. Wait 10 minutes for foam to rebound.
- Record Recovered Thickness: Measure thickness at the same points again. The difference from your baseline is the permanent compression after one load cycle.
- Repeat (Optional): For more precise data, repeat the load/unload cycle 3–5 times to simulate cumulative fatigue. Track how the permanent compression accumulates.
- Log Data: Enter all numbers in your notebook or spreadsheet, including shoe brand/model, age (km), and date. (Template below.)
Example Log:
2025-05-22 | Altra Timp 3 | Heel (pre): 27.6 mm | Heel (post): 24.9 mm | Compression: 2.7 mm (10%) | 720 km | 2nd cycle
6️⃣ Common Mistakes & Calibration Tips
- Inconsistent Measurement Points: Always mark and use exactly the same locations (heel and forefoot). A 2 mm shift can throw off your results.
- Uneven Surfaces: Place shoes on a solid, truly flat surface—avoid carpet, soft mats, or wobbly tables.
- Inaccurate Load: Use a scale to check the real weight of whatever objects you use. Water jugs can be slightly underfilled, books may be lighter than labeled.
- Foam Memory: Measure only after shoes have been at room temperature and “rested” (not just after a run or drying in sun).
- Ambient Temperature: Foam hardness and rebound change with temperature. Try to do each test under similar climate conditions for consistent results (ideally 18–24°C).
- Dirty or Wet Shoes: Always clean and fully dry your shoes before testing. Moisture temporarily softens most foams.
- Cheap Rulers: Digital calipers or precision rulers improve accuracy. Avoid tape measures or flexible plastic rulers.
Calibration Pro Tip: If you have two identical shoes (one new, one used), test both in the same session. The difference in permanent compression is a powerful indicator of foam aging.
7️⃣ How to Log and Graph Your Results
Keeping detailed records allows you to spot trends, compare shoes, and predict exactly when cushioning drops below safe limits.
- Use a spreadsheet or paper log with columns: Date | Shoe Model | Mileage | Test Point | Pre-load mm | Under-load mm | Post-load mm | Compression %
- After each test, plot “Compression % vs. Mileage” for each shoe. Use line graphs to visualize change over time.
- Mark “replacement threshold” on the graph (e.g., 10% or 15% permanent compression).
- If you test multiple pairs, color-code or label each shoe for clarity.
- Review at 100 km intervals, or monthly for high-mileage runners.
Sample Table:
| Date | Shoe | Mileage (km) | Heel pre (mm) | Heel post (mm) | Compression % |
|---|---|---|---|---|---|
| 2025-05-10 | Hoka Rincon | 400 | 29.1 | 26.8 | 7.9% |
| 2025-05-10 | Altra Timp 3 | 700 | 28.2 | 24.7 | 12.4% |
| 2025-05-10 | New Shoe | 0 | 31.0 | 30.5 | 1.6% |
Quick Visual: Plotting your data will quickly reveal which models last longest and which collapse early.

8️⃣ What % Compression Means: Scientific Benchmarks & Replacement
- 3–5% Compression: Typical for shoes with less than 200 km. Nearly all original cushion remains. No action needed.
- 7–10% Compression: “Healthy but aging”—keep monitoring. This is often reached at 300–600 km for lightweight trail shoes.
- 10–15% Compression: Replacement zone. Scientific studies and pro coaches advise rotating or replacing at this point, especially for injury-prone runners.
- 15%+ Compression: Cushioning is considered “dead”. Shock absorption drops by 25–40%, injury risk rises sharply. Time to retire or use only for walking/errands.
Science Note: “Lab tests show that most EVA and TPU midsoles lose 20–35% of their cushioning within the first 500 km, with permanent compression accounting for the majority of the decline.” (Shoetech Journal, 2023)
Some PEBA/PEBAX foams (often called “superfoams”) retain resilience slightly longer, but even they show ~10% permanent compression by 600–800 km in real-world tests.
- Pro Tip: If your shoe feels dead before hitting these benchmarks, trust your legs—visualize in-sole “wrinkling” or excessive foot fatigue.
- Heavy runners (85kg+): Compression will accelerate—monitor every 100–150 km.
- Racers: Retire shoes earlier; use “dead” shoes only for easy runs or walking.
9️⃣ Real-World Examples & User Cases
- Example 1: Lost Pace, 69 kg, trail ultra runner—Altra Timp 3, 790 km, 2.7 mm heel compression (10%). Shoe still “feels okay” but started causing mild foot soreness on long descents. Retired at 830 km when permanent compression hit 13.5%.
- Example 2: Runner B, 82 kg, Hoka Speedgoat 5, 540 km—Compression rose from 3% (new) to 8% (at 400 km), then jumped to 14% at 550 km. Shoe was “flat” on rocky sections. Switched to a new pair and soreness vanished.
- Example 3: Recreational user, 60 kg, Nike Terra Kiger—Tested every 100 km. At 400 km, compression was 5.5%; by 750 km, hit 12.8%. Foam still felt springy, but visible sidewall wrinkles. Used for short walks thereafter.
- Example 4: Heavier runner, 93 kg, Asics FujiTrabuco, mostly muddy terrain. Compression hit 11% at only 320 km. Decided to monitor more often; used next pair for rotation.
Pattern: Most runners find that compression jumps sharply in the final 100–200 km of a shoe’s lifespan. Early warning signs include more rock-bruising, “slap” sounds, and a dull, hard landing feel.
🔗 Internal Links
- Measure Midsole Hardness With a $20 Shore-A Durometer
- When to Retire Trail Shoes? Data-Driven Mileage & Cushion Thresholds
- DIY Trail-Shoe Gear Care: Wash, Deodorize, Repair & Protect Your Runners
Internal anchor keywords: home midsole test, midsole durometer DIY, trail shoe compression loss, foam durability test, at-home shoe compression, shoe replacement timeline, foam breakdown signs
❓ Frequently Asked Questions
🛠️ 1. What is midsole compression and why does it matter?
Midsole compression refers to the permanent loss of thickness in a shoe’s cushioning foam due to repetitive loading. It matters because once a certain threshold is crossed, the shoe loses shock absorption, increasing injury risk and reducing comfort. 📏 2. How accurate is a DIY compression test compared to lab tests?
While not as precise as a professional drop machine or UTM, a carefully performed DIY test (same weight, position, tool) gives results within 1–2 mm of lab setups—enough for practical shoe retirement decisions. 🧰 3. Which household tools can I use if I don’t have a digital caliper?
A metal ruler with 1 mm increments works, but for more consistent readings, use a cheap analog caliper (hardware stores, ~200₺) or a digital model for the best accuracy. ⚖️ 4. How much weight should I use in the test?
10–20 kg is typical, simulating the downward force of a running step. Just be sure the same weight is used every time for tracking. 📅 5. How often should I test my trail shoes?
Every 100–200 km for main training shoes, or whenever the shoe “feels flat.” For heavy runners or racers, check every 50–100 km near the end of life. 📝 6. What’s the best way to record and compare results?
Use a spreadsheet (Google Sheets, Excel) or a notebook. Log by date, shoe, mileage, and compression % for each test point. 💡 7. My results vary a lot between tests. What am I doing wrong?
Most likely: inconsistent measurement points, uneven surfaces, or different weights. Mark your shoe, use a flat surface, and stick to the same tools for best accuracy. ❄️ 8. Does temperature affect the foam or my measurements?
Yes! Most foams get harder and rebound less in cold temperatures. Try to test at consistent room temperature for best results. 🦶 9. Is this method useful for road shoes or only trail shoes?
Works for both! Any shoe with an EVA, TPU, PU, or PEBA foam midsole can be tracked using this protocol. 👣 10. Should I test at the heel or forefoot?
Ideally both! Most runners see more compression in the heel, but forefoot breakdown is common in forefoot strikers or after long descents. 🔁 11. How many load cycles should I run in each test?
For most users, one cycle is enough to track aging. For experimental or side-by-side tests, 3–5 cycles shows how fast the foam “creeps.” 🔬 12. Can I compare results between different shoe models?
Absolutely—plotting different shoes on one graph lets you see which foams last longer or are more resilient. 🧪 13. Is it worth buying a cheap durometer to measure foam hardness?
Yes, if you want extra data! Durometer readings help correlate compression with foam “firmness.” See our durometer guide for details. 🔗 14. What other signs show a shoe is “dead” besides compression?
Look for sidewall wrinkles, uneven outsole wear, “bottoming out” on rocks, or a slap-like landing sound. Also, persistent new aches or soreness can signal the end. 💦 15. Does cleaning or wet weather impact my test results?
Wet foam is softer and rebounds less. Always test when shoes are fully dry to avoid inaccurate low readings. 🧵 16. Should I test after shoe repairs (e.g. glued outsole, patched lugs)?
Yes, but be aware that added glue or patches may slightly change compression readings. It’s most accurate on original midsoles. ⏳ 17. How much permanent compression is too much?
Most research and pro coaches recommend replacing shoes at 10–15% permanent compression, or sooner if you feel reduced support. 💣 18. Can I revive a compressed midsole?
Unfortunately, no—foam “creep” is a one-way process. Some bounce may return after resting, but permanent loss cannot be reversed. 👟 19. Will this protocol void my shoe warranty?
Not at all—there’s no modification, only measurement. You’re just tracking the natural wear process. 🧑🔬 20. Where can I share my results or see what others have found?
Many runners post on Reddit (r/RunningShoeGeeks), trail running forums, or Strava. Share your log to help the community!
📚 Further Reading
🪛 Midsole Hardness Guide
Measure durometer at home for more shoe data.
⏳ Trail Shoe Replacement Timeline
When to retire shoes by compression & mileage.
🔧 DIY Gear Care Pillar
Washing, deodorizing, and protecting trail shoes.
- Long-term Performance Change of Running Shoes (ResearchGate) – Scientific article on midsole aging and durability metrics.
- How Long Should Running Shoes Last? (Runner’s World) – Practical overview for all runners.
- Cushioning Properties of Running Shoes (PubMed) – Peer-reviewed biomechanical study.
- Shoe Cushion Durability: Tested (Sole Review) – Lab tests and user cases.
📝 Quiz: Test Your Knowledge
- What is the main cause of midsole foam breakdown in trail shoes?
- Why is it better to use a caliper instead of a tape measure?
- What % of permanent compression is usually considered the “replacement zone” for trail shoes?
- How does temperature affect your compression test results?
- What are the top three user mistakes that cause inaccurate readings?
✅ Quiz Answers
- Repeated loading and foam “creep” from running impact.
- Calipers give much more precise, consistent readings at the same spot.
- 10–15% permanent compression.
- Colder temps make foam stiffer and reduce rebound; test at consistent room temp.
- Wrong measurement points, uneven surface, inconsistent weights.
Found this guide useful? Share it: 🐦 Twitter 💬 WhatsApp 📘 Facebook 💼 LinkedIn 👽 Reddit 📌 Pinterest ✉️ Email 🔗 Copy Link
🏁 Final Thoughts
A little measurement goes a long way. By making the DIY midsole compression test part of your shoe routine, you’ll maximize both your investment and your injury-free miles. No guesswork, no wasted gear—just data-driven running! Got questions or want to share your results? Drop a comment below or connect with the trail gear community.
Internal anchor keywords: home midsole test, midsole durometer DIY, trail shoe compression loss, foam durability test, at-home shoe compression, shoe replacement timeline, foam breakdown signs

About the Author
Lost Pace is an ultramarathon runner, shoe-tester and the founder of umit.net. Based year-round in Türkiye’s rugged Kaçkar Mountains, he has logged 10,000 + km of technical trail running and completed multiple 50 K–100 K ultras.
Blending mountain grit with data, Lost analyses power (CP 300 W), HRV and nutrition to craft evidence-backed training plans. He has co-written 260 + long-form guides on footwear science, recovery and endurance nutrition, and is a regular beta-tester of AI-driven coaching tools.
When he isn’t chasing PRs or testing midsoles, you’ll find him sharing peer-reviewed research in plain English to help runners train smarter, stay healthier and finish stronger.
Ultrarunner · Data geek · Vegan athlete

